Keeping track of everything you want or need to buy this holiday season can be tricky. But as it turns out, there's a great way to prepare and stay organised: Amazon’s Wishlist tool (also known simply as a “List”).
Here’s everything you need to know about making and using an Amazon Wish List.
The benefits of Lists on Amazon
Amazon Lists are a great way to keep track of the items you want most, and the deals you want to take advantage of.
During busy shopping times like the holidays, it's a great way to organise things and keep track of prices and deals in Amazon stores. When the price of an item drops or a deal becomes available, you can choose to be notified via a push alert if you’re using the Amazon app.
When to create a List
Lists are also great for birthdays and other special occasions for which people may want to buy gifts for you or your family members. When loved ones ask you for gift ideas, you can simply share the list with them with the click of a button. As items are purchased, they are no longer visible on the list, so you don’t accidentally end up with multiples.
Lists are also a great way to keep track of your own shopping lists, not just gifts. Maybe you’re redecorating a room in your home, or going on vacation and need a few things. Perhaps you’re in the middle of cooking a big meal and realise you’re missing some key cooking tools. Create a new Amazon List to keep track of everything you want or need.
How to create a List
There are a few ways to create a new List.
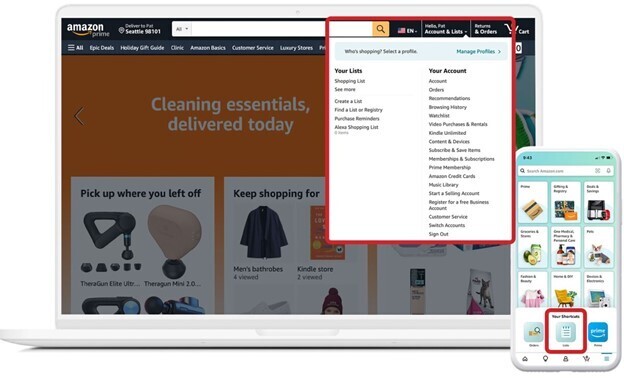
When you’re logged into your Amazon account on a browser, you should see “Account & Lists” at the top of the page. When you hover over that, you’ll see a column titled “Your Lists,” and from there you can create a list.

If you’re using the Amazon app, you’ll click the icon with three horizontal lines in the bottom right corner, and then you will see “Lists” as an option on the bottom of the screen. Once you open that page, you can see your existing Lists or create a new one.
Another way to create a new List is from a product page. As you’re browsing items in Amazon’s store, you will find a drop down on the right side of your screen that says “Add to List.” You can choose an existing List you may have already created, or create a new one from there. You can also ask your Alexa device to create a new List.
How to name your Lists and edit your settings
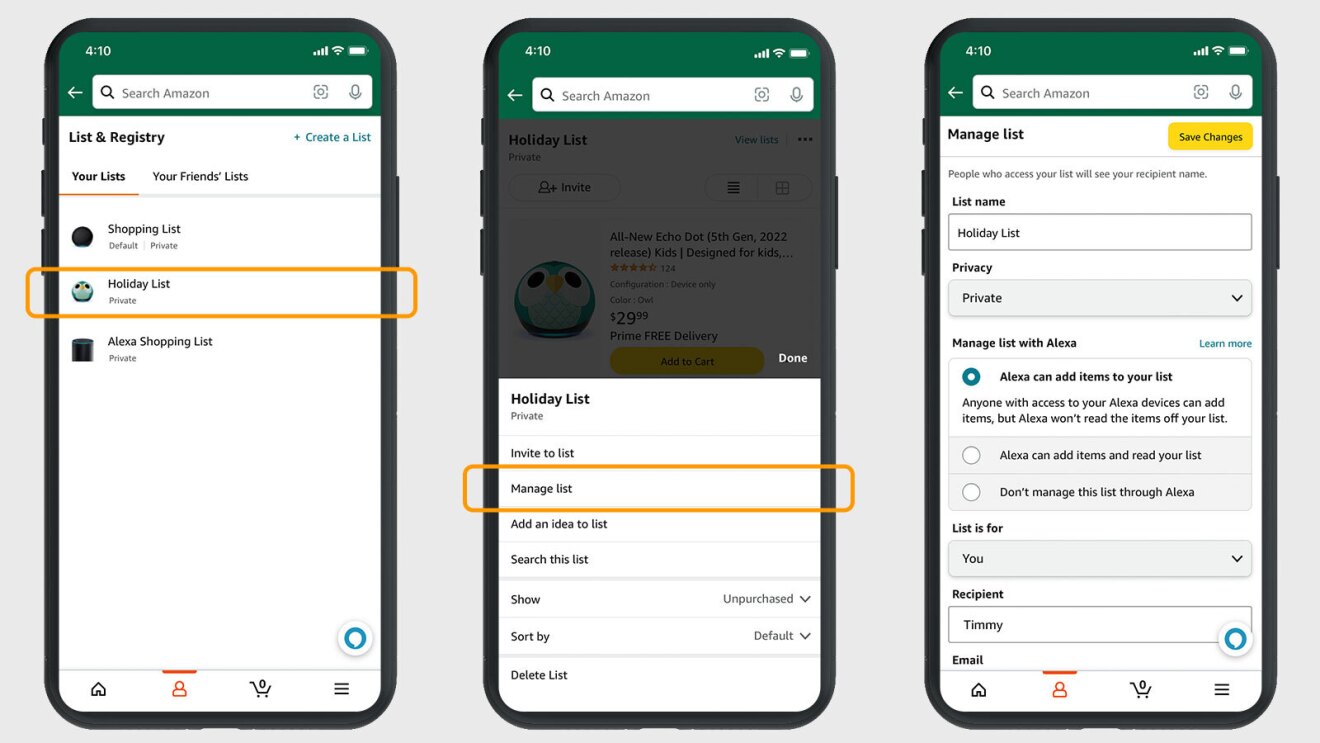
As you create your Lists—however you do it—you’ll be prompted to name them.
You can also manage each List’s settings. For example, you may decide whether to include a shipping address, as well as the option to let anyone with access to your Alexa devices to add items to your Lists.

You can also choose to keep purchased items on the list, and whether or not to “spoil my surprises” (meaning, you won’t see which items have been purchased unless you try to buy an item that someone already bought).
How to add items to your List
As mentioned above, any time you’re on a product page in Amazon’s store, you should see the option to add the item to your Lists.
How to share your List
Your Lists will remain private until you’re ready to share with others. (Even if you have no intention of sharing, a List can be a helpful way to keep things you want or need to buy very organised!).
Once you’re ready to share, you’ll see an “Invite” button at the top of your list. You can either copy the link, or choose the “Email” or “Text Message” option.
Lists are an easy way to keep things organised, so try making one today.
Next, check out 7 tips to get the most out of shopping on Amazon.


